

FakeNet Genie: Improving Dynamic Malware Analysis with Cheat Codes for FakeNet-NG
As developers of the network simulation tool FakeNet-NG, reverse
engineers on the FireEye FLARE team, and malware analysis instructors,
we get to see how different analysts use FakeNet-NG and the challenges
they face. We have learned that FakeNet-NG provides many useful
features and solutions of which our users are often unaware. In this
blog post, we will showcase some cheat codes to level up your network
analysis with FakeNet-NG. We will introduce custom responses and
demonstrate powerful features such as executing commands on connection
events and decrypting SSL traffic.
Since its first release
in 2016, we have improved FakeNet-NG
by adding new features such as Linux
support and content-based
protocol detection. We recently updated FakeNet-NG with one of
our most requested features: custom responses for HTTP and binary protocols.
This blog post offers seven “stages” to help you master
different FakeNet-NG strategies. We present them in terms of common
scenarios we encounter when analyzing malware. Feel free to skip to
the section relevant to your current analysis and/or adapt them to
your individual needs. The stages are presented as follows:
- Custom File Responses
- Custom Binary Protocols
- Custom HTTP Responses
- Manual Custom Responses
- Blacklisting Processes
- Executing Commands on Connection
Events - Decrypting SSL Traffic
Read on to upgrade your skill tree and become a FakeNet-NG pro!
Before You Start: Configuring FakeNet-NG
Here is a quick reference for FakeNet-NG configurations and log data locations.
- Configuration files are in fakenetconfigs. You can modify default.ini or copy it to a new file and point
FakeNet-NG to the alternate configuration with -c. Ex: fakenet.py -c
custom.ini. - Default files are at fakenetdefaultFiles and Listener
implementations are at fakenetlisteners. - The fakenetconfigsdefault.ini default
configuration includes global configuration settings and individual
Listener configurations. - Custom response configuration
samples are included in the directory fakenetconfigs in the files CustomProviderExample.py, sample_custom_response.ini, and sample_raw_response.txt. - The install
location for FakeNet-NG in FLARE VM is C:Python27libsite-packagesfakenet. You will
find the subdirectories containing the defaultFiles, configs,
and listeners in this directory. - In FLARE VM, FakeNet-NG packet capture files and HTTP requests
can be found on the Desktop in the fakenet_logs directory
Stage 1: Custom File Responses
As you may have noticed, FakeNet-NG is not limited to serving HTML
pages. Depending on the file type requested, FakeNet-NG can serve PE
files, ELF files, JPG, GIF, etc. FakeNet-NG is configured with several
default files for common types and can also be configured to serve up
custom files. The defaultFiles directory
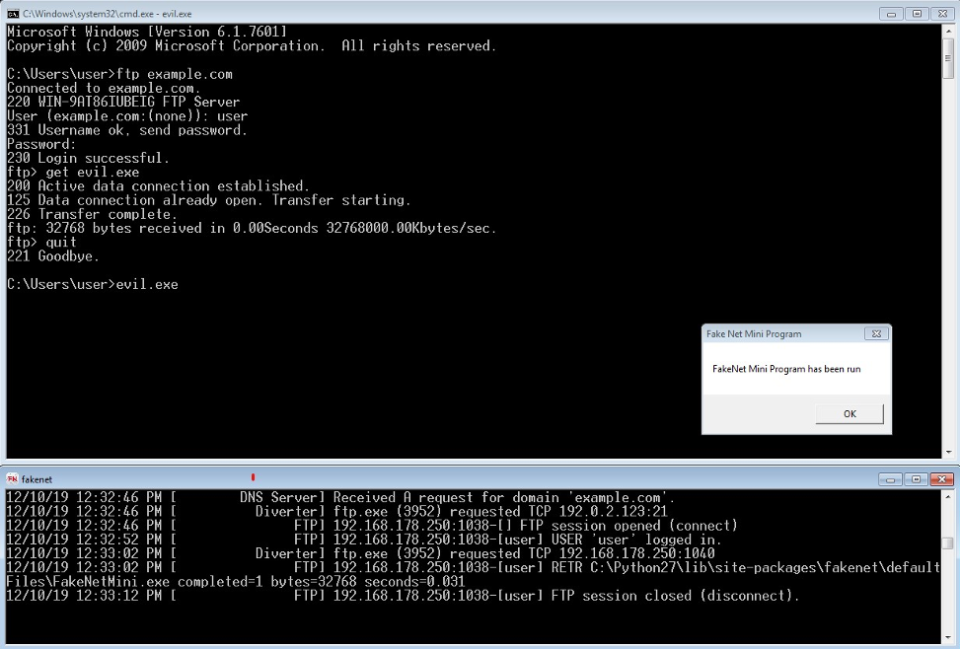
contains several types of files for standard responses. For example,
if malware sends an FTP GET request for evil.exe, FakeNet-NG will respond with the file
defaultFilesFakeNetMini.exe (the default
response for .exe requests). This file is a valid Portable Executable
file that displays a message box. By providing an actual PE file, we
can observe the malware as it attempts to download and execute a
malicious payload. An example FTP session and subsequent execution of
the downloaded default file is shown in Figure 1.
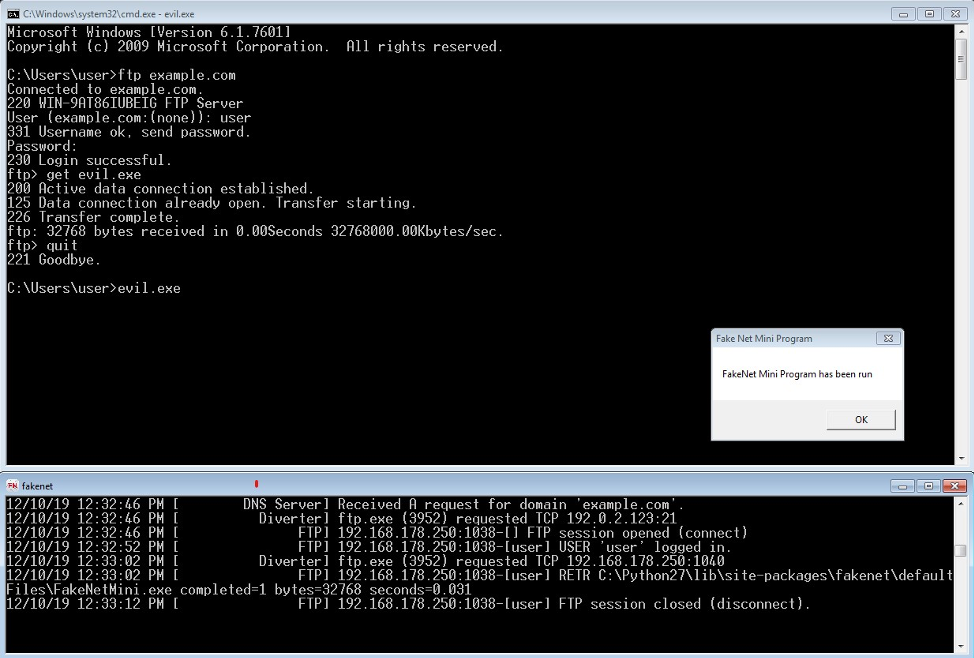
Figure 1: Using FTP to download
FakeNet-NG’s default executable response
Most requests are adequately handled by this system. However,
malware sometimes expects a file with a specific format, such as an
image with an embedded PowerShell script, or an executable with a hash
appended to the file for an integrity check . In cases like these, you
can replace one of the default files with a file that meets the
malware’s expectation. There is also an option in each of the relevant
Listeners (modules that implement network protocols) configurations to
modify the defaultFiles path. This allows
FakeNet-NG to serve different files without overwriting or modifying
default data. A customized FakeNet.html
file is shown in Figure 2.
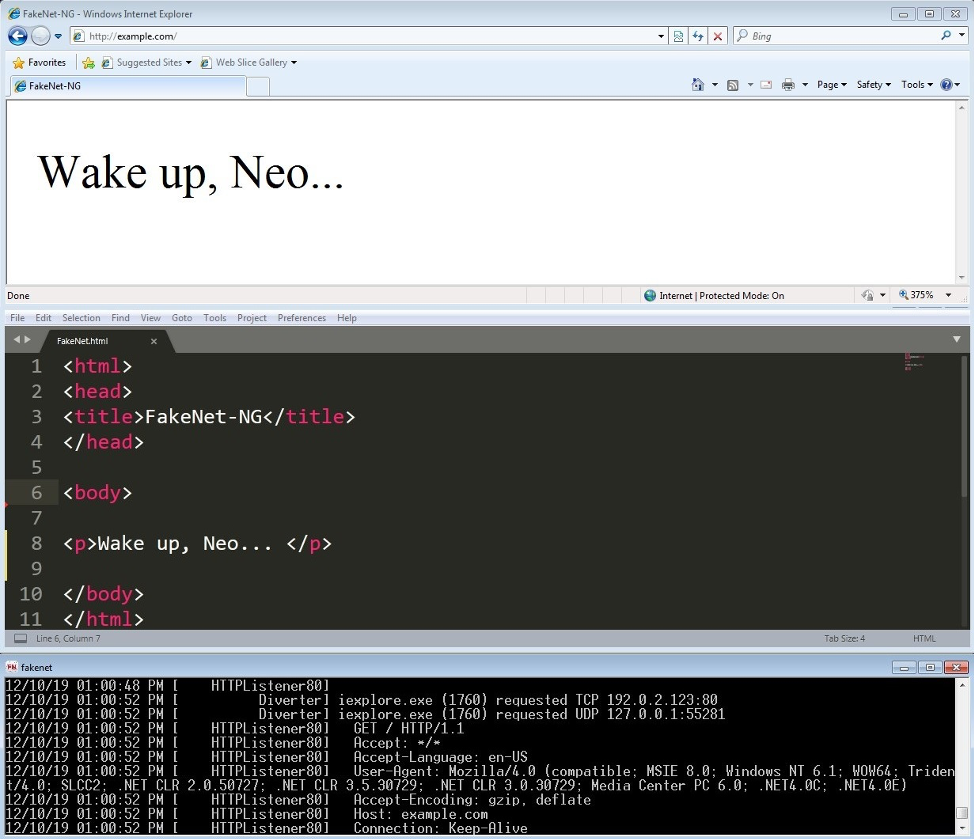
Figure 2: Modify the default FakeNet.html
file to customize the response
Stage 2: Custom Binary Protocols
Many malware samples implement custom binary protocols which require
specific byte sequences. For example, malware in the GH0ST family may
require each message to begin with a signature such as
“GH0ST”. The default FakeNet-NG RawListener responds to unknown requests with an
echo, i.e. it sends the same data that it has received. This behavior
is typically sufficient. However, in cases where a custom response is
required, you can still send the data the malware expects.
Custom TCP and UDP responses are now possible with FakeNet-NG.
Consider a hypothetical malware sample that beacons the string “Hello”
to its command and control (C2) server and waits for a response packet
that begins with “FLARE” followed by a numeric command (0-9). We will
now demonstrate several interesting ways FakeNet-NG can handle this scenario.
Static Custom Response
You can configure how the TCP and/or UDP Raw Listeners respond to
traffic. In this example we tell FakeNet-NG how to respond to any TCP
raw request (no protocol detected). First uncomment the Custom configuration option in the RawTCPListener section of fakenet/configs/default.ini as illustrated in
Figure 3.
| [RawTCPListener] Enabled: True Port: 1337 Protocol: TCP Listener: RawListener UseSSL: No Timeout: 10 Hidden: False # To read about customizing responses, see docs/CustomResponse.md Custom: sample_custom_response.ini |
Figure 3: Activate custom TCP response
Next configure the TcpRawFile custom
response in fakenetconfigssample_custom_response.ini as
demonstrated in Figure 4. Make sure to comment-out or replace the
default RawTCPListener instance.
| [ExampleTCP] InstanceName: RawTCPListener ListenerType: TCP TcpRawFile: flare_command.txt |
Figure 4: TCP static custom response specifications
Create the file fakenetconfigsflare_command.txt with the content
FLARE0. TCP responses will now be
generated from the contents of the file.
Dynamic Custom Response
Perhaps you want to issue commands dynamically rather than
committing to a specific command in flare_command.txt. This can be achieved
programmatically. Configure the TcpDynamic
custom response in fakenetconfigssample_custom_response.ini as
demonstrated in Figure 5. Make sure to comment-out or replace the
existing RawTCPListener instance.
| [ExampleTCP] InstanceName: RawTCPListener TcpDynamic: flare_command.py |
Figure 5: TCP dynamic custom response specifications
The file fakenetconfigsCustomProviderExample.py can be
used as a template for our dynamic response file flare_command.py. We modify the HandleTcp() function and produce the new file
fakenetconfigsflare_command.py as
illustrated in Figure 6. Now you can choose each command as the
malware executes. Figure 7 demonstrates issuing commands dynamically
using this configuration.
|
import socket def HandleTcp(sock):
while True:
data = sock.recv(1024)
if not data:
resp = raw_input(‘nEnter a numeric |
Figure 6: TCP dynamic response script

Figure 7: Issue TCP dynamic commands
Stage 3: Custom HTTP Responses
Malware frequently implements its own encryption scheme on top of
the popular HTTP protocol. For example, your sample may send an HTTP
GET request to /comm.php?nonce=<random> and expect the C2
server response to be RC4 encrypted with the nonce value. This process
is illustrated in Figure 8. How can we easily force the malware to
execute its critical code path to observe or debug its behaviors?

Figure 8: Malware example that expects a
specific key based on beacon data
For cases like these we recently introduced support for HTTP custom
responses. Like TCP custom responses, the HTTPListener also has a new setting named Custom that enables dynamic HTTP responses. This
setting also allows FakeNet-NG to select the appropriate responses
matching specific hosts or URIs. With this feature, we can now quickly
write a small Python script to handle the HTTP traffic dynamically
based upon our malware sample.
Start by uncommenting the Custom configuration option in the HTTPListener80 section as illustrated in Figure 9.
| [HTTPListener80] Enabled: True Port: 80 Protocol: TCP Listener: HTTPListener UseSSL: No Webroot: defaultFiles/ Timeout: 10 #ProcessBlackList: dmclient.exe, OneDrive.exe, svchost.exe, backgroundTaskHost.exe, GoogleUpdate.exe, chrome.exe DumpHTTPPosts: Yes DumpHTTPPostsFilePrefix: http Hidden: False # To read about customizing responses, see docs/CustomResponse.md Custom: sample_custom_response.ini |
Figure 9: HTTP Listener configuration
Next configure the HttpDynamic custom
response in fakenetconfigssample_custom_response.ini as
demonstrated in Figure 10. Make sure to comment-out or replace the
default HttpDynamic instance.
| [Example2] ListenerType: HTTP HttpURIs: comm.php HttpDynamic: http_example.py |
Figure 10: HttpDynamic configuration
The file fakenetconfigsCustomProviderExample.py can be
used as a template for our dynamic response file http_example.py. We modify the HandleRequest() function as illustrated in Figure
11. FakeNet-NG will now encrypt responses dynamically with the nonce.
|
import socket
# To read about customizing HTTP responses,
def HandleRequest(req, method,
Parameters
response = ‘Ahoyrn’
nonce = req.path.split(‘=’)[1]
req.send_response(200) |
Figure 11: Dynamic HTTP request handler
Stage 4: Manual Custom Responses
For even more flexibility, the all-powerful networking utility netcat can be used to stand-in for FakeNet-NG
listeners. For example, you may want to use netcat to act as a C2 server and issue commands
dynamically during execution on port 80. Launch a netcat listener before starting FakeNet-NG, and
traffic destined for the corresponding port will be diverted to the
netcat listener. You can then issue
commands dynamically using the netcat
interface as seen in Figure 12.
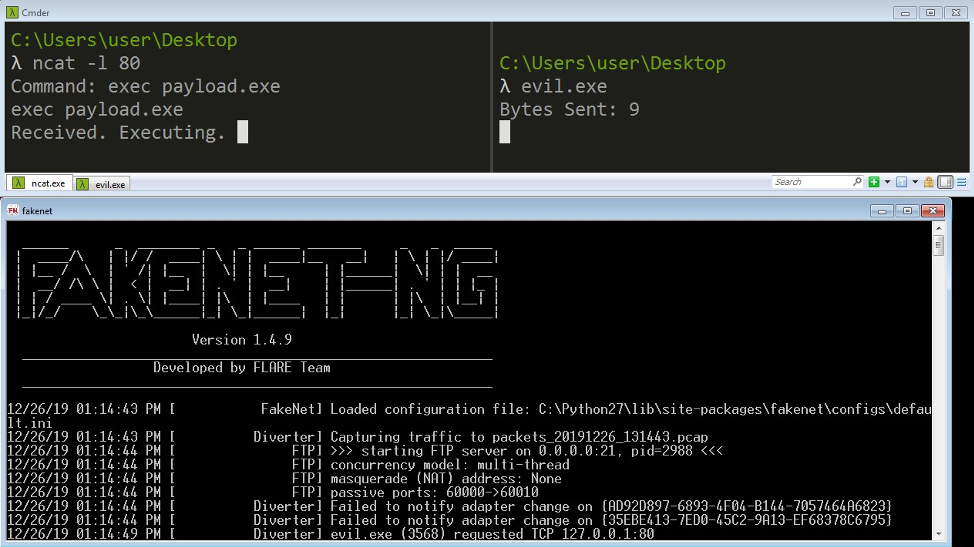
Figure 12: Use ncat.exe to manually
handle traffic
FakeNet-NG’s custom response capabilities are diverse. Read the documentation
to learn how to boost your custom response high score.
Stage 5: Blacklisting Processes
Some analysts prefer to debug malware from a separate system. There
are many reasons to do this; most commonly to preserve the IDA
database and other saved data when malware inevitably corrupts the
environment. The process usually involves configuring two virtual
machines on a host-only network. In this setup, FakeNet-NG intercepts
network traffic between the two machines, which renders remote
debugging impossible. To overcome this obstacle, we can blacklist the
debug server by instructing FakeNet-NG to ignore traffic from the
debug server process.
When debugging remotely with IDA Pro, the standard debug server
process for a 32-bit Portable Executable is win32_remote.exe (or dbgsrv.exe for WinDbg). All you need to do is add
the process names to the ProcessBlackList
configuration as demonstrated in Figure 13. Then, the debug servers
can still communicate freely with IDA Pro while all other network
traffic is captured and redirected by FakeNet-NG.
| # Specify processes to ignore when diverting traffic. Windows example used here. ProcessBlackList: win32_remote.exe, dbgsrv.exe |
Figure 13: Modified configs/default.ini to allow
remote debugging with IDA Pro
Blacklisting is also useful to filter out noisy processes from
polluting Fakenet-NG captured network traffic. Examples include
processes that attempt to update the Windows system or other malware
analysis tools.
Additional settings are available for blacklisting ports and hosts.
Please see the README for more
details about blacklisting and whitelisting.
Stage 6: Executing Commands on Connection Events
Fakenet-NG can be configured to execute commands when a connection
is made to a Listener. For example, this option can be used to attach
a debugger to a running sample upon a connection attempt. Imagine a
scenario where we analyze the packed sample named Lab18-01.exe from the Practical Malware
Analysis labs. Using dynamic analysis, we can see that the
malware beacons to its C2 server over TCP port 80 using the HTTP
protocol as seen in Figure 14.
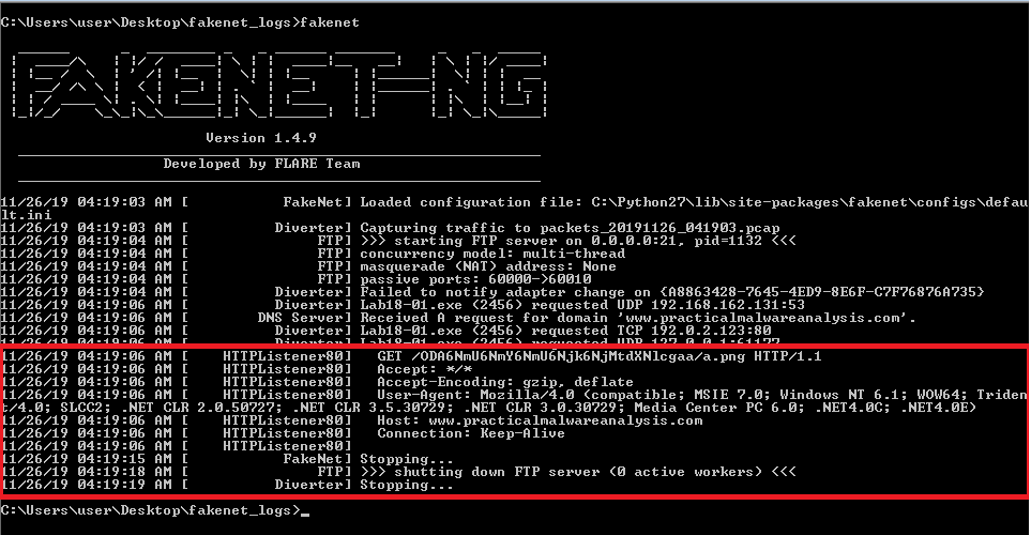
Figure 14: Malware beacons to its C2
server over TCP port 80
Wouldn’t it be nice if we could magically attach a debugger to Lab18-01.exe when a connection is made? We could
speedrun the sample and bypass the entire unpacking stub and any
potential anti-debugging tricks the sample may employ.
To configure Fakenet-NG to launch and attach a debugger to any
process, modify the [HTTPListener80] section
in the fakenetconfigsdefault.ini to
include the ExecuteCmd option. Figure 15
shows an example of a complete [HTTPListener80] section.
| [HTTPListener80] Enabled: True Port: 80 Protocol: TCP Listener: HTTPListener UseSSL: No Webroot: defaultFiles/ Timeout: 10 DumpHTTPPosts: Yes DumpHTTPPostsFilePrefix: http Hidden: False # Execute x32dbg –p to attach to a debugger. {pid} is filled in automatically by Fakenet-NG ExecuteCmd: x32dbg.exe -p {pid} |
Figure 15: Execute command option to run and
attach x32dbg
In this example, we configure the HTTPListener on port 80 to execute the debugger
x32dbg.exe, which will attach to a running
process whose process ID is determined at runtime. When a connection
is made to HTTPListener, FakeNet-NG will
automatically replace the string {pid} with
the process ID of the process that makes the connection. For a
complete list of supported variables, please refer to the Documentation.
Upon restarting Fakenet-NG and running the sample again, we see
x32dbg launch and automatically attach to
Lab18-01.exe. We can now use memory
dumping tools such as Scylla or the OllyDumpEx plugin to dump the executable and
proceed to static analysis. This is demonstrated in Figure 16 and
Figure 17.
Figure 16: Using FakeNet-NG to attach
x32dbg to the sample (animated)
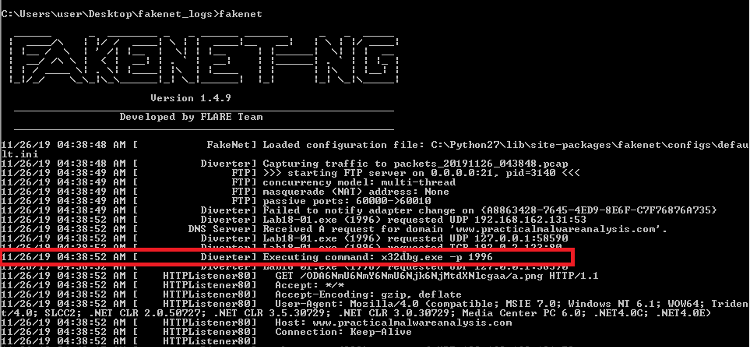
Figure 17: Fakenet-NG executes x32dbg
upon connection to practicalmalwareanalysis.com
Stage 7: Decrypting SSL Traffic
Often malware uses SSL for network communication, which hinders
traffic analysis considerably as the packet data is encrypted. Using
Fakenet-NG’s ProxyListener, you can create a
packet capture with decrypted traffic. This can be done using the
protocol detection feature.
The proxy can detect SSL, and “man-in-the-middle” the
socket in SSL using Python’s OpenSSL library. It then maintains
full-duplex connections with the malware and with the HTTP Listener,
with both sides unaware of the other. Consequently, there is a stream
of cleartext HTTP traffic between the Proxy and the HTTP Listener, as
seen in Figure 18.
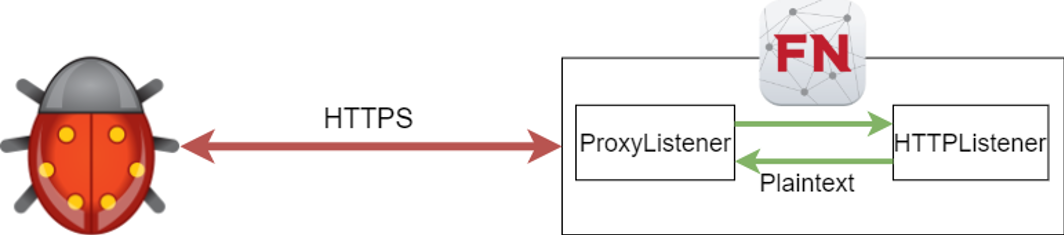
Figure 18: Cleartext streams between
Fakenet-NG components
In order to keep FakeNet-NG as simple as possible, current default
settings for FakeNet-NG do not have the proxy intercept HTTPS traffic
on port 443 and create the decrypted stream. To proxy the data you
need to set the HTTPListener443 Hidden
attribute to True as demonstrated in Figure
19. This tells the proxy to intercept packets and detect the protocol
based on packet contents. Please read
our blog post on the proxy and protocol detection to learn more
about this advanced feature.
| [HTTPListener443] Enabled: True Port: 443 Protocol: TCP Listener: HTTPListener UseSSL: Yes Webroot: defaultFiles/ DumpHTTPPosts: Yes DumpHTTPPostsFilePrefix: http Hidden: True |
Figure 19: Hide the listener so the traffic will
be proxied
We can now examine the packet capture produced by Fakenet-NG. The
cleartext can be found in a TCP stream between an ephemeral port on
localhost (ProxyListener) and port 80 on
localhost (HTTPListener). This is
demonstrated in Figure 20.
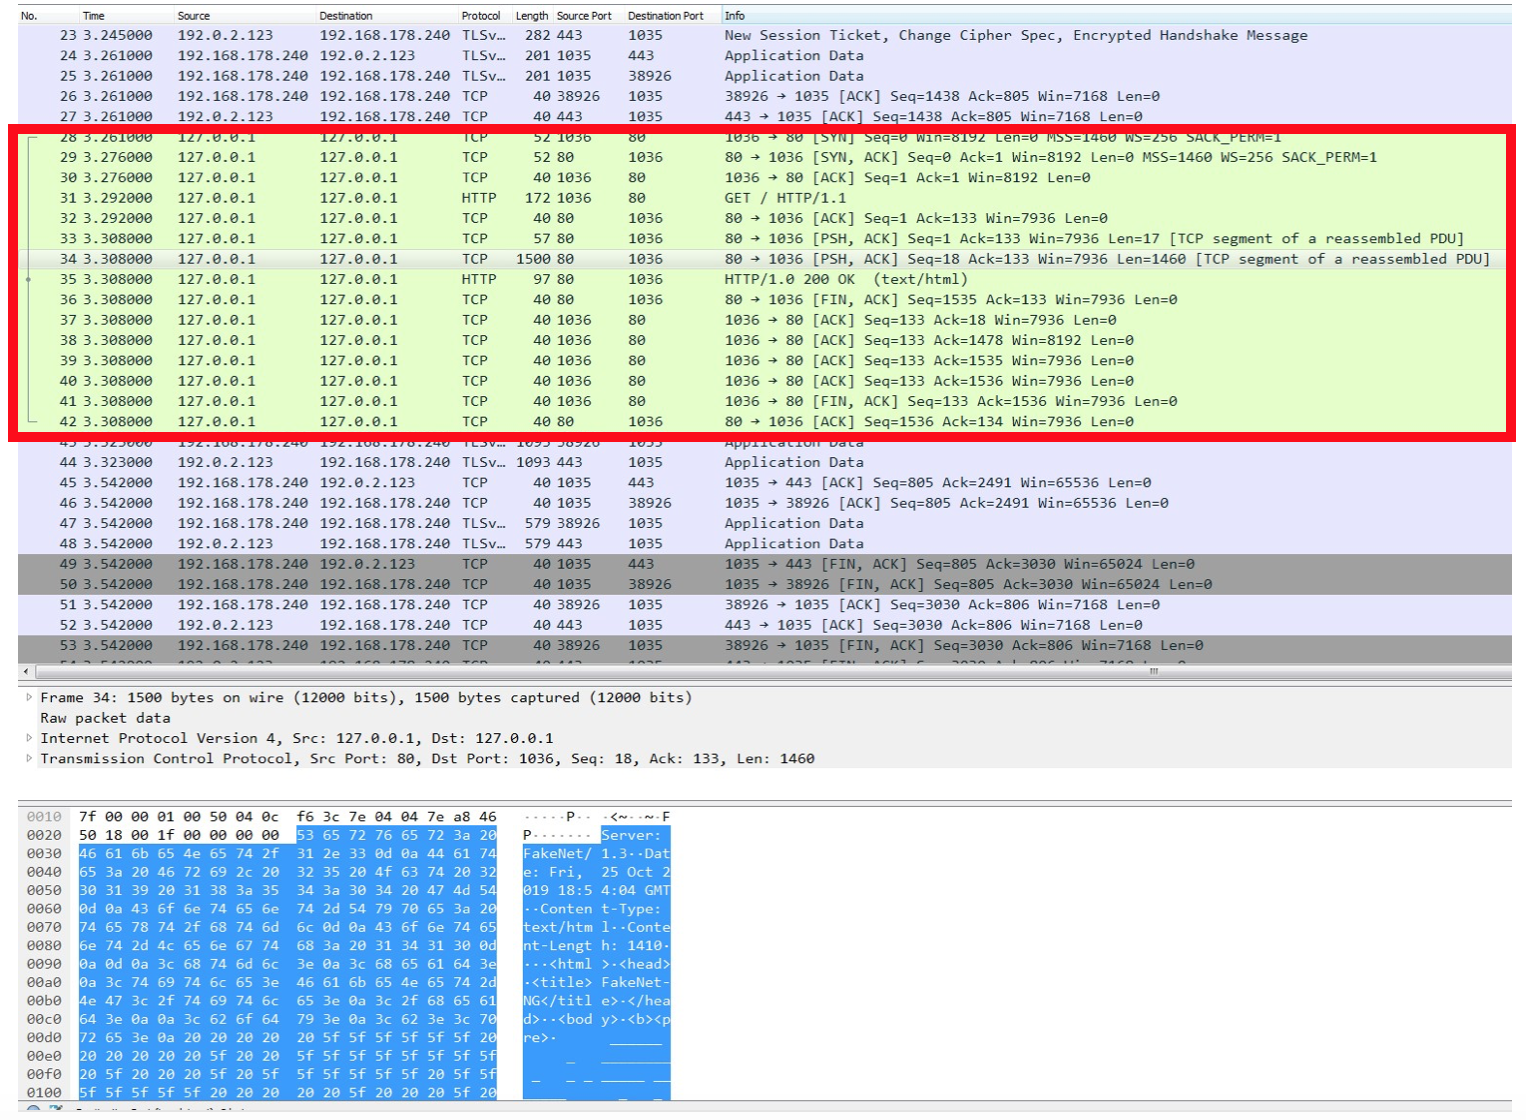
Figure 20: Cleartext traffic between
HTTPListener and Proxy Listener
Conclusion (New Game+)
Fakenet-NG is the de facto standard network simulation tool for
malware analysis. It runs without installation and is included in
FLARE VM. In addition to its proven and tested default settings,
Fakenet offers countless capabilities and configuration options. In
this blog post we have presented several tricks to handle common
analysis scenarios. To download the latest version, to see a complete
list of all configuration options, or to contribute to Fakenet-NG,
please see our Github repository.