

Solving Ad-hoc Problems with Hex-Rays API
Introduction
IDA Pro is the de facto standard when it comes to binary reverse engineering. Besides being a great disassembler and debugger, it is possible to extend it and include a powerful decompiler by purchasing an additional license from Hex-Rays. The ability to switch between disassembled and decompiled code can greatly reduce the analysis time.
The decompiler (from now on referred to as Hex-Rays) has been around for a long time and has achieved a good level of maturity. However, there seems to be a lack of a concise and complete resources regarding this topic (tutorials or otherwise). In this blog, we aim to close that gap by showcasing examples where scripting Hex-Rays goes a long way.
Overview of a Decompiler
In order to understand how the decompiler works, it’s helpful to first review the normal compilation process.
Compilation and decompilation center around the concept of an Abstract Syntax Tree (AST). In essence, a compiler takes the source code, splits it into tokens according to a grammar, then these tokens are grouped into logical expressions. In this phase of the compilation process, referred to as parsing, the code structure is represented as a complex object, the AST. From the AST, the compiler will produce assembly code for the specified platform.
A decompiler takes the opposite route. From the given assembly code, it works back to produce an AST, and from this to produce pseudocode.
From all the intermediate steps between code and assembly, we are stressing the AST so much because most of the time you will spend using the Hex-Rays API, you will actually be reading and/or modifying the Abstract Syntax Tree (or ctree in Hex-Rays terminology).
Items, Expressions and Statements
Now we know that Hex-Rays’s ctree is a tree-like data structure. The nodes of this tree are either of type cinsn_t or cexpr_t. We will define these in a moment, but for now it is important to know that both derive from a very basic type, namely the citem_t type, as seen in the following code snippet:

Therefore, all nodes in the ctree will have the op property, which indicates the node type (variable, number, logical expression, etc.).
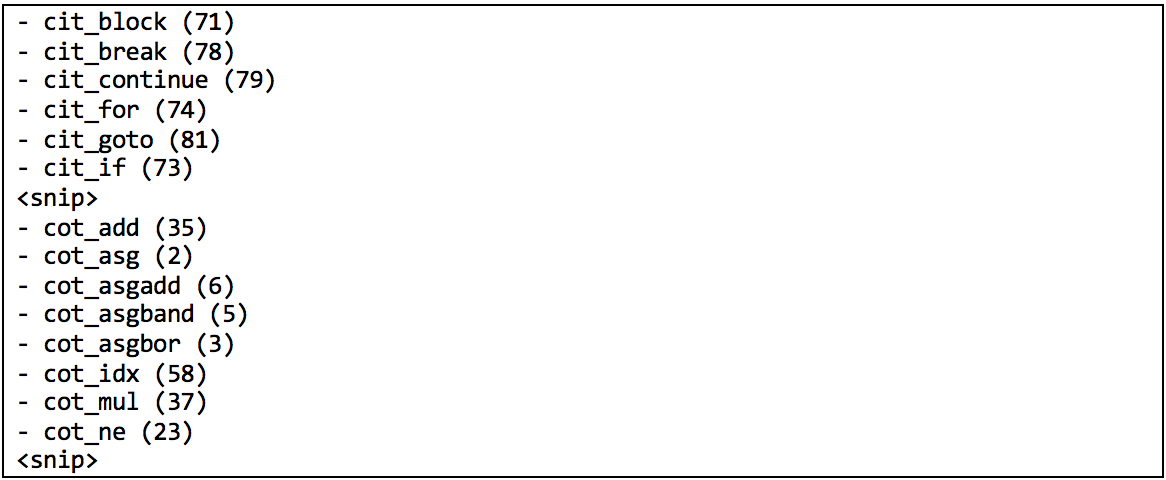
The type of op (ctype_t) is an enumeration where all constants are named either cit_<xyz> (for statements) or cot_<xyz> (for expressions). Keep this in mind, as it will be very important. A quick way to inspect all ctype_t constants and their values is to execute the following code snippet:

This produces the following output:
Let’s dive a bit deeper and explain the two types of nodes: expressions and statements.
It is useful to think about expressions as the “the little logical elements” of your code. They range from simple types such as variables, strings or numerical constants, to small code constructs (assignments, comparisons, additions, logical operations, array indexing, etc.).
These are of type cexpr_t, a large structure containing several members. The members that can be accessed depend on its op value. For example, the member n to obtain the numeric value only makes sense when dealing with constants.
On the other side, we have statements. These correlate roughly to language keywords (if, for, do, while, return, etc.) Most of them are related to control flow and can be thought as “the big picture elements” of your code.
Recapitulating, we have seen how the decompiler exposes this tree-like structure (the ctree), which consists of two types of nodes: expressions and statements. In order to extract information from or modify the decompiled code, we have to interact with the ctree nodes via methods dependent on the node type. However, the following question arises: “How do we reach the nodes?”
This is done via a class exposed by Hex-Rays: the tree visitor (ctree_visitor_t). This class has two virtual methods, visit_insn and visit_expr, that are executed when a statement or expression is found while traversing the ctree. We can create our own visitor classes by inheriting from this one and overloading the corresponding methods.
Example Scripts
In this section, we will use the Hex-Rays API to solve two real-world problems:
- Identify calls to GetProcAddress to dynamically resolve Windows APIs, assigning the resulting address to a global variable.
- Display assignments related to stack strings as characters instead of numbers, for easier readability.
GetProcAddress
The first example we will walk through is how to automatically handle renaming global variables that have been dynamically resolved at run time. This is a common technique malware uses to hide its capabilities from static analysis tools. An example of dynamically resolving global variables using GetProcAddress is shown in Figure 1.
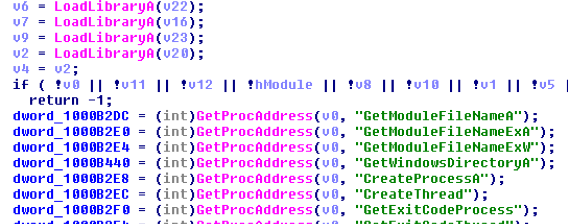
Figure 1: Dynamic API resolution using GetProcAddress
There are several ways to rename the global variables, with the simplest being manual copy and paste. However, this task is very repetitive and can be scripted using the Hex-Rays API.
In order to write any Hex-Rays script, it is important to first visualize the ctree. The Hex-Rays SDK includes a sample, sample5, which can be used to view the current function’s ctree. The amount of data shown in a ctree for a function can be overwhelming. A modified version of the sample was used to produce a picture of a sub-ctree for the function shown in Figure 1. The sub-ctree for the single expression: ‘dword_1000B2D8 = (int)GetProcAdress(v0, “CreateThread”);’ is shown in Figure 2.
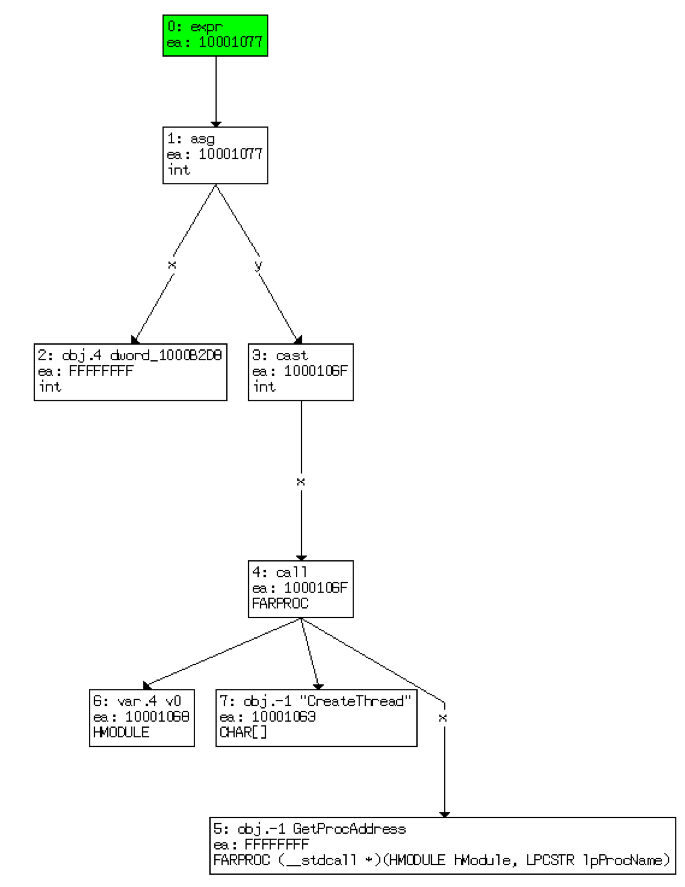
Figure 2: Sub-ctree for GetProcAddress assignment
With knowledge of the sub-ctree in use, we can write a script to automatically rename all the global variables that are being assigned using this method.
The code to automatically rename all the local variables is shown in Figure 3. The code works by traversing the ctree looking for calls to the GetProcAddress function. Once found, the code takes the name of the function being resolved and finds the global variable that is being set. The code then uses the IDA MakeName API to rename the address to the correct function.
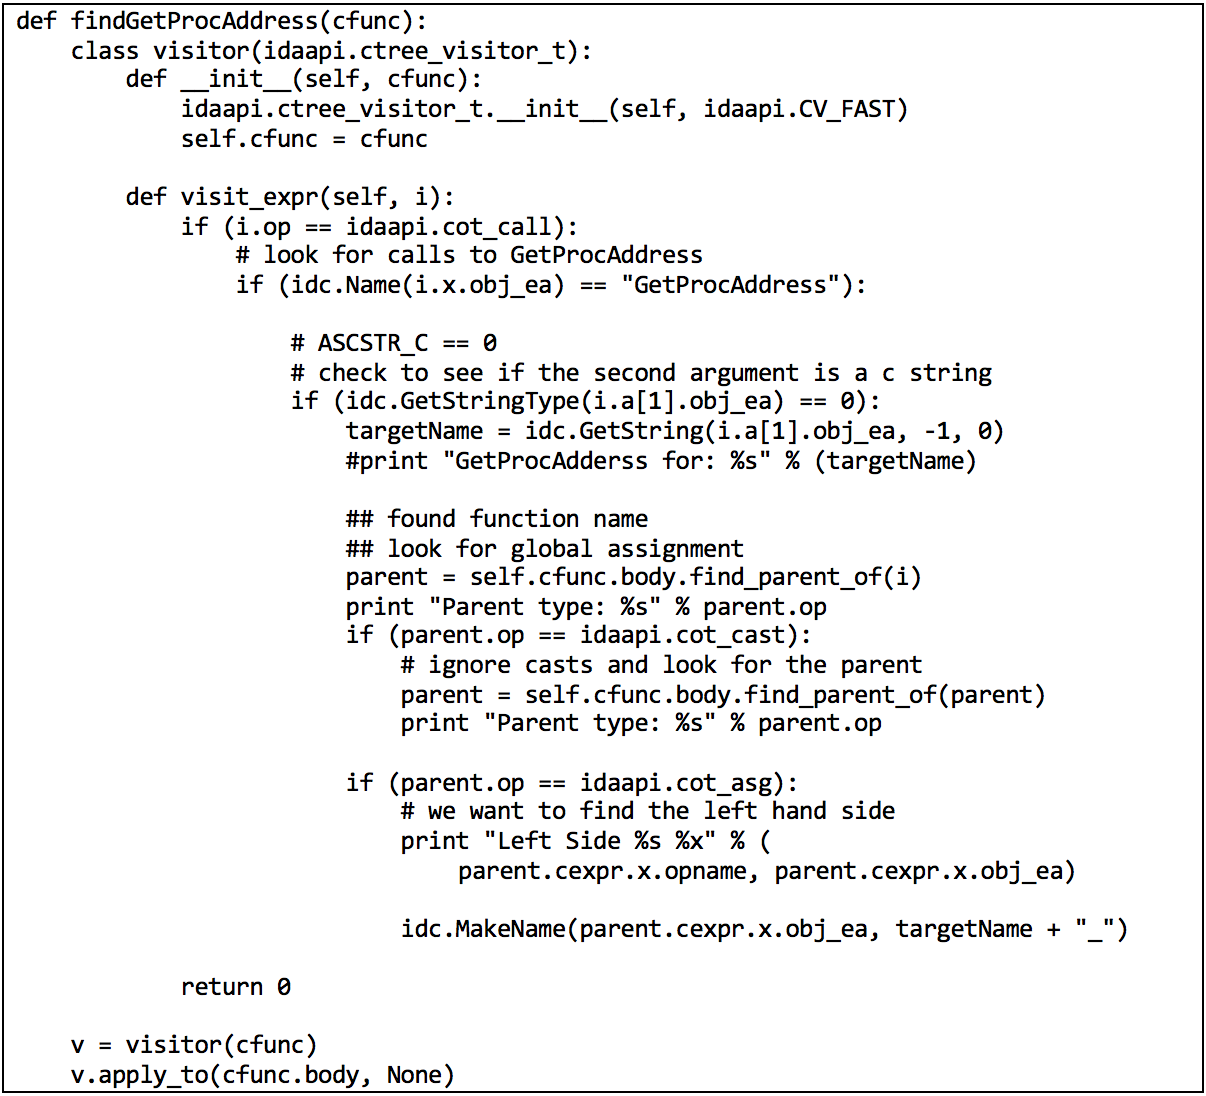
Figure 3: Function renaming global variables
After the script has been executed, we can see in Figure 4 that all the global variables have been renamed to the appropriate function name.
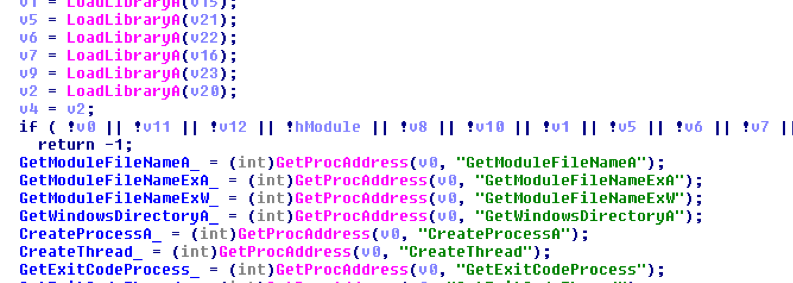
Figure 4: Global variables renamed
Stack Strings
Our next example is a typical issue when dealing with malware: stack strings. This is a technique aimed to make the analysis harder by using arrays of characters instead of strings in the code. An example can be seen in Figure 5; the malware stores each character’s ASCII value in the stack and then references it in the call to sprintf. At a first glance, it’s very difficult to say what is the meaning of this string (unless of course, you know the ASCII table by heart).
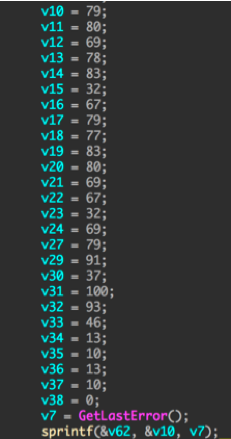
Figure 5: Hex-Rays decompiler output. Stack strings are difficult to read.
Our script will modify these assignments to something more readable. The important part of our code is the ctree visitor mentioned earlier, which is shown in Figure 6.
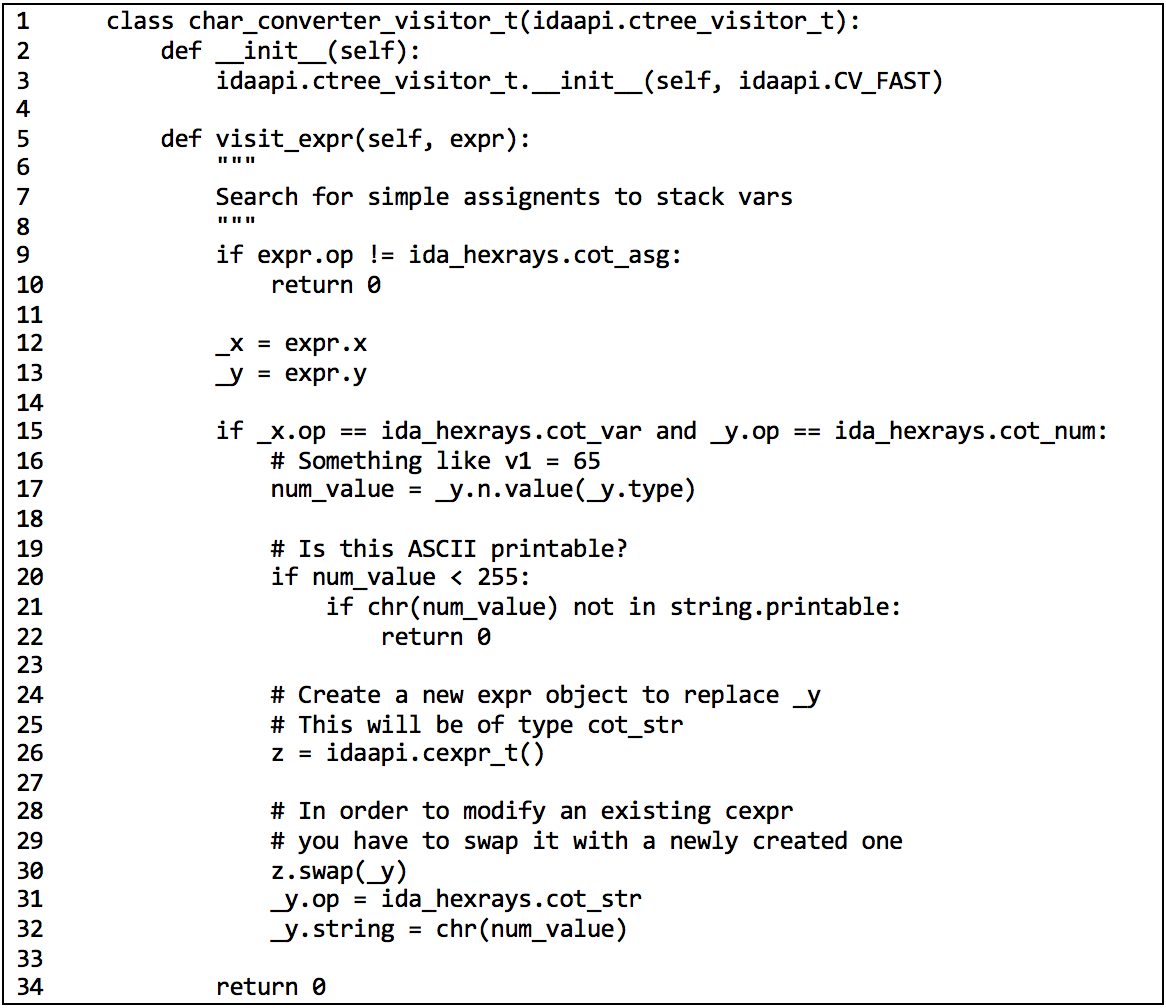
Figure 6: Custom ctree visitor
The logic implemented here is pretty straightforward. We define our subclass of a ctree visitor (line 1) and override its visit_expr method. This will only kick in when an assignment is found (line 9). Another condition to be met is that the left side of the assignment is a variable and the right side a number (line 15). Moreover, the numeric value must be in the readable ASCII range (lines 20 and 21).
Once this kind of expression is found, we will change the type of the right side from a number to a string (lines 26 to 31), and replace its numerical value by the corresponding ASCII character (line 32).
The modified pseudocode after running this script is shown in Figure 7.

Figure 7: Assigned values shown as characters
You can find the complete scripts in our FLARE GitHub repository under decompiler scripts
Conclusion
These two admittedly simple examples should be able to give you an idea of the power of IDA’s decompiler API. In this post we have covered the foundations of all decompiler scripts: the ctree object, a structure composed by expressions and statements representing every element of the code as well the relationships between them. By creating a custom visitor we have shown how to traverse the tree and read or modify the code elements, therefore analyzing or modifying the pseudocode.
Hopefully, this post will motivate you to start writing your own scripts. This is only the beginning!
Do you want to learn more about these tools and techniques from FLARE? Then you should take one of our Black Hat classes in Las Vegas this summer! Our offerings include Malware Analysis Crash Course, macOS Malware for Reverse Engineers, and Malware Analysis Master Class.
References
Although written in 2009, one of the best references is still the original article on the Hex-Rays blog.